 Vista

Bookbinding stitches secure folded paper sections into a book or booklet. A pamphlet stitch can bind a single folded section through a small number of spine holes. Coptic sewing often produces a distinctive exposed-spine chain-like link between sections and covers. Kettle stitches are important connecting stitches at the ends of multi-signature sewing patterns, while French link stitch creates a visible crossing or linked pattern along the book spine. These four diagrams help you recognise the stitch families and plan sewing stations; they are illustrations, not universal instructions for every cover style or conservation project.
Updated 21 November 2026. These stitch illustrations are educational; conservation treatment requires specialist guidance.
Four illustrated bookbinding stitch pattern charts



How sewn bookbinding holds pages together
A folded group of pages is known as a signature or section. A handmade book may contain a single signature, as in many small pamphlets, or multiple signatures assembled into a text block. Thread passes through sewing holes along the fold of each signature, sometimes linking to an earlier section or around tapes and supports. The way the thread travels changes how the book opens, how its spine looks and how well the sections are kept aligned.
A stitch pattern is only part of the binding. Paper grain, fold accuracy, signature thickness, choice of thread, hole placement, covers, adhesive where used, and overall structure all affect durability. For a beginner, accurate folding and a simple, repeatable sewing sequence are more important than an ornate exposed spine. The charts on this page show characteristic paths and should be read alongside a full tutorial for the chosen binding construction.
Pamphlet stitch: an accessible one-signature start
A basic three-hole pamphlet stitch binds a single folded signature through the spine and sometimes through a lightweight cover. The familiar method marks a centre station and two others along the fold, then passes thread so the ends can be secured inside the fold. Variations include five-hole pamphlet sewing and different choices of where the knot rests. Its relatively small number of holes makes it well suited to short zines, handouts and small notebooks.
Mark and fold carefully before piercing. Arrange your pages in correct reading order, use a paper-safe awl against a suitable support and pierce the fold rather than accidentally cutting through printed pages. Test thread length and a sample hole pattern on scrap. If you add a cover, ensure its hole placement matches the section fold. A three-hole stitch is not the same as a permanent sewn text block made from many signatures.
Coptic stitch: exposed-spine linking of signatures
Coptic binding commonly uses a linked chain-style sewing pattern visible across the exposed spine, joining signatures and often rigid boards. The arrangement can allow the book to open widely, sometimes quite flat, because the spine is not glued into the same kind of rigid case structure as many other bindings. The appearance is attractive for sketchbooks, journals and handmade gifts; however, its exact behaviour depends on board attachment and the precise sewing construction.
There is not one universal Coptic pattern for every number of holes or cover design. Some tutorials build link stitches between signatures; others use particular loops near the boards. The stitch holes must line up and have enough paper around them to avoid tearing when the book opens. A decorative photo is not enough to infer the full sewing sequence. Follow one complete instructional pattern rather than combining steps from unrelated diagrams halfway through.
Kettle stitch: its role at the head and tail of sewing
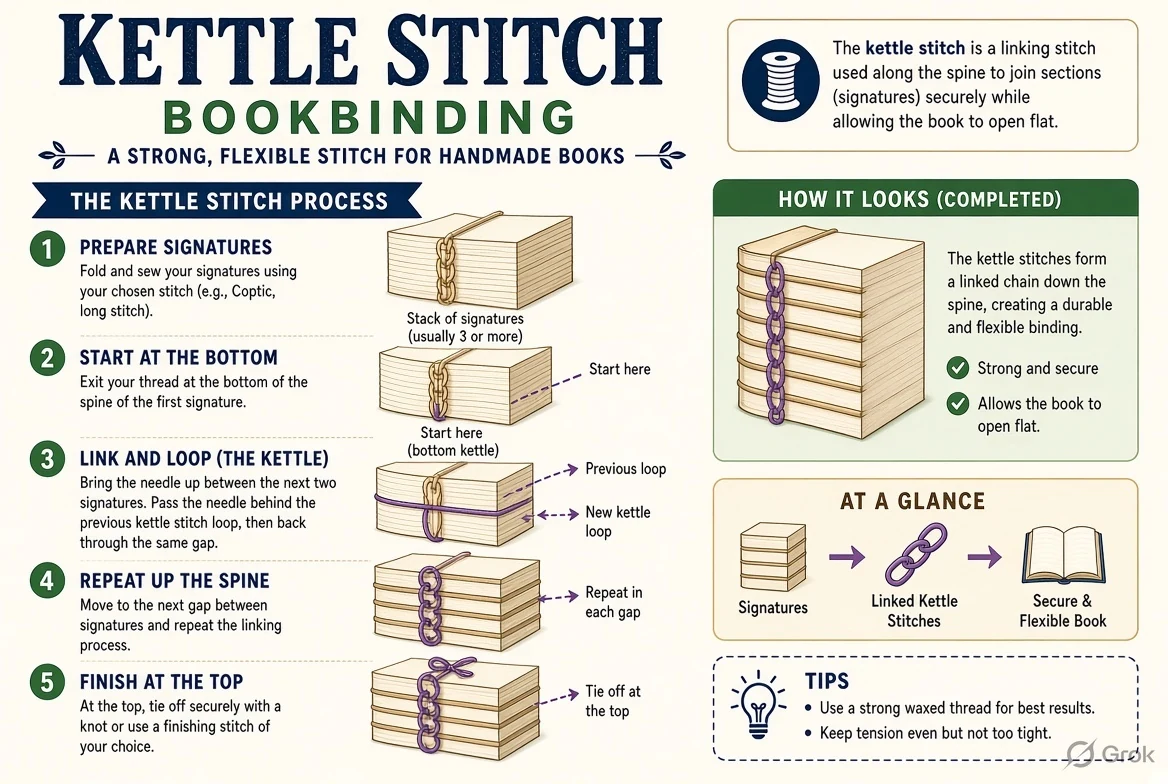
In many multi-signature binding traditions, kettle stitches help connect sections at the ends of the sewing line, near the head and tail. These stitches are not necessarily an entire standalone binding structure; they are often part of a larger pattern that also includes other thread movements. Their exact form differs among bookbinding methods, and students may encounter the name in Western book-sewing and Coptic-related tutorials.
A common error is to see a decorative line of stitches and call every link a kettle stitch. It is better to identify where the stitch occurs and what it joins. Kettle-stitch stations are typically planned close enough to the ends of the spine to stabilise section sewing while leaving adequate material to prevent tearing. University book-arts instructions often demonstrate how a hole guide ensures matching station positions across multiple folded sections.
French link stitch: crossing and linking between sections
French link stitch is a multi-signature sewing method that forms distinctive crossed or linked thread lines across the spine. It is often practised as an exposed sewing structure for notebooks and decorative books, though the exact construction may also be used with additional binding elements. The thread travels through stations in successive folded sections and loops around prior thread, creating a repeatable visible pattern when the book is assembled.
French link sewing rewards consistent spacing and thread tension. Too-loose links may allow sections to shift, while pulling excessively tight can tear the holes, distort the folds or create an uneven spine. The visual pattern is attractive, but you still need to decide how covers will attach and whether extra spine supports or other finishing elements are required. Never assume the presence of a French-link pattern by itself proves archival suitability.
Bookbinding tools: awl, needle, thread, bone folder and weights
A basic hand-binding workspace can include an awl for piercing sewing stations, a suitable bookbinding needle, strong thread appropriate for paper, a ruler, pencil, cutting mat, folding tool and a protective surface for piercing. A bone folder or suitable alternative can make a crisp fold, though pressure should be gentle on delicate paper. Clips and light weights may help keep stacked signatures aligned during planning.
Needles and awls are sharp, so work slowly and maintain a clear, stable surface. Do not push an awl toward your supporting hand. If using a knife or board-cutting tool, follow appropriate safety guidance and use an approved cutting surface. Some craftspeople use waxed linen thread or another compatible material; the thread should not be so thick that it splits folded paper. For rare or valuable books, conservation guidance matters more than hobby convenience.
How to plan sewing stations and thread path
Before punching any holes, choose the number and size of signatures, their folded height and the binding pattern. Create a single paper or card template called a sewing-hole guide so every section has matching station positions. Measure consistently from the head and tail rather than marking each signature by eye. Decide how the covers attach, because cover sewing may require different holes or an extra first-and-last section manoeuvre.
Lay the thread route out on paper first: draw each signature as a horizontal line, mark the holes and sketch the travel from one station to the next. For a pamphlet, you might have three stations; a Coptic or French link design may use more. Exact count is not universal. Check that the chosen tutorial supports your actual number of sections and cover style. Do a short practice sewing with two or three scrap sections before making the final journal.
Four visual diagrams: compare the stitch families
The first chart shows the exposed Coptic linking pattern. The second outlines a simple pamphlet stitch and station planning. The third explains the location and connecting role of kettle stitches in a book’s sewing sequence. The fourth shows the more decorative linking path associated with French link stitching. Reading them in that order helps distinguish a whole binding style from a stitch technique used within a more complex structure.
Each diagram is an illustration of characteristic stitch paths and may simplify a construction detail for readability. It cannot show exact tension, thread handling behind each fold or every cover attachment. If two instructional methods seem inconsistent, use the directions of one trusted tutorial from start to finish. The University of Toronto’s bookbinding resources and the University of Brighton’s book-arts hole-guides are useful companions for exploring patterns.
Common mistakes, repair limits and a beginner study plan
Beginners often pierce holes at different heights in each signature, over-tighten stitches or forget to check page order before sewing. A second common issue is using a long continuous thread that becomes tangled and rough from repeated passes. Work with manageable thread lengths and learn the tutorial’s proper joining method before adding extra thread. Keep the sections square during sewing; alignment is harder to correct after the book is completed.
For a first project, make a three-hole pamphlet with a small folded paper section. Next practise a simple exposed-spine Coptic-style sample with several signatures, using a complete tutorial suitable for beginners. When that is consistent, compare kettle stitches and French link stitches on scrap text blocks. If repairing an old book, particularly a rare, signed, brittle or historically important item, do not punch new holes or apply hobby glue; seek a conservator’s assessment.
Stitch pattern comparison table
| Method | Typical structure | Useful first project |
|---|---|---|
| Pamphlet stitch | One folded section through spine holes | Zine or booklet |
| Coptic sewing | Linked multi-signature exposed-spine binding | Sketchbook |
| Kettle stitch | Section-connecting stitch at sewing ends | Multi-signature binding sample |
| French link | Linked/crossed thread path between signatures | Decorative sewn notebook |
Frequently asked questions
What is a pamphlet stitch?
A simple sewn binding for one folded signature, commonly practised with three or five spine holes.
Does Coptic stitch leave the spine exposed?
Often yes; exposed linking stitches are a characteristic feature of many Coptic-style bindings.
Is a kettle stitch a whole bookbinding method?
Often it is a linking stitch at the ends of multi-section sewing, part of a broader structure.
What is French link stitch used for?
Joining signatures with a distinctive visible linked pattern.
How many holes should I make for Coptic sewing?
It depends on the chosen pattern, book size and cover structure; use a complete tutorial and a hole guide.
Can I rebind an antique book from this chart?
No. Valuable or brittle books need appropriate conservation assessment.
Conclusion and learning references
Start from correct paper folding and matched sewing stations. Learn a simple pamphlet pattern first, then study the different ways multi-section stitches link a text block and its covers.
- University of Toronto Libraries: bookbinding basics
- University of Brighton: making a sewing-hole guide
- University of the Arts London: book arts learning resources



Share Your Opinion
Comments are closed on this post.