 Vista
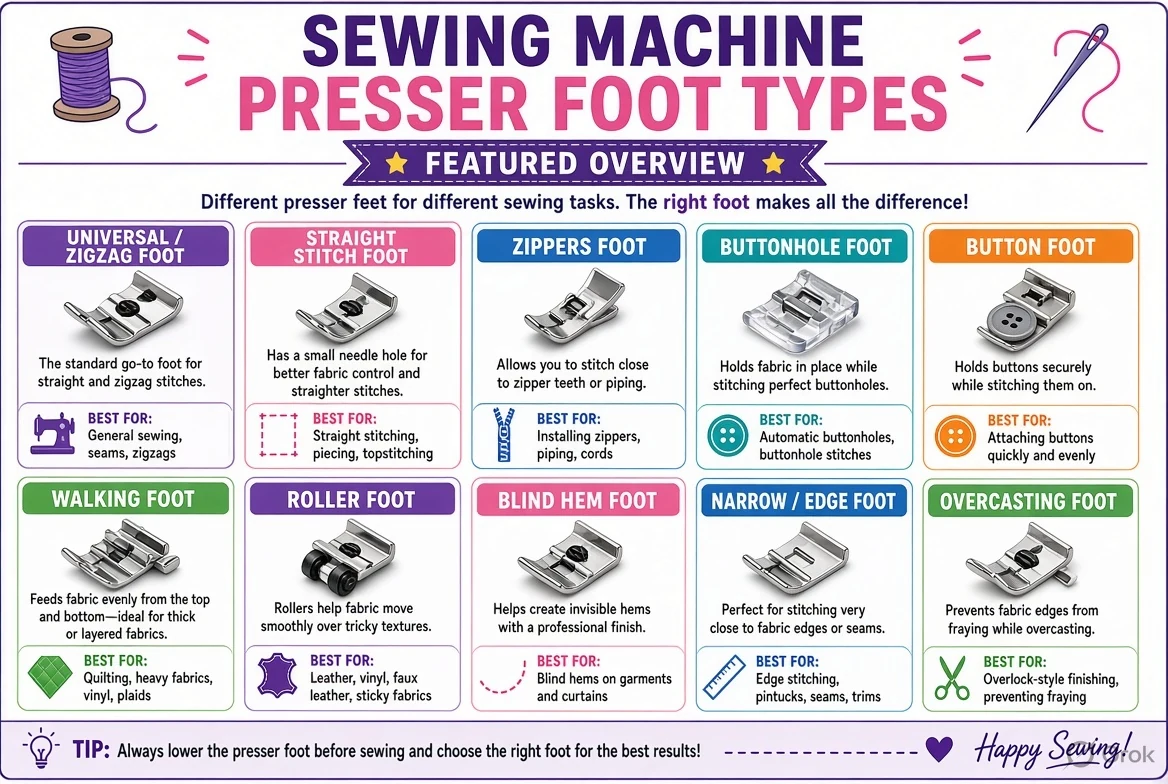
A sewing machine presser foot holds the fabric against the feed system while the needle makes stitches. Different feet are shaped for different tasks: a zipper foot gets close to zipper teeth, an invisible-zipper foot guides concealed coils, a walking foot helps feed layers evenly, an overcasting foot guides edge stitches, a blind-hem foot helps position folded fabric, and a buttonhole foot supports consistent buttonhole stitching. These four visual guides show the differences and help you choose a foot that actually fits your sewing machine.
Updated 21 November 2026. Always confirm the presser-foot compatibility and stitch position from your sewing machine manual.
Four sewing presser foot identification illustrations
What does a presser foot do, and why does shape matter?
The presser foot is the part under the needle bar area that presses fabric toward the machine’s feed dogs. Its position and underside allow fabric to move through the machine with the stitch you select. A general-purpose foot suits many straight stitches and zigzags, but it cannot perform every task equally well. Specialised feet can guide an edge, elevate a bulky zipper coil, smooth several fabric layers or help maintain a consistent seam position.
A special foot is not an automatic replacement for correct thread tension, stitch width, needle choice or fabric handling. The same foot can perform differently on heavy denim, slippery satin or thin knit. Before changing it, consult the user manual, make sure the machine is switched off, raise the presser foot and needle, and confirm that the machine’s presser-foot holder is compatible with the accessory.
Standard foot, zipper foot and invisible zipper foot
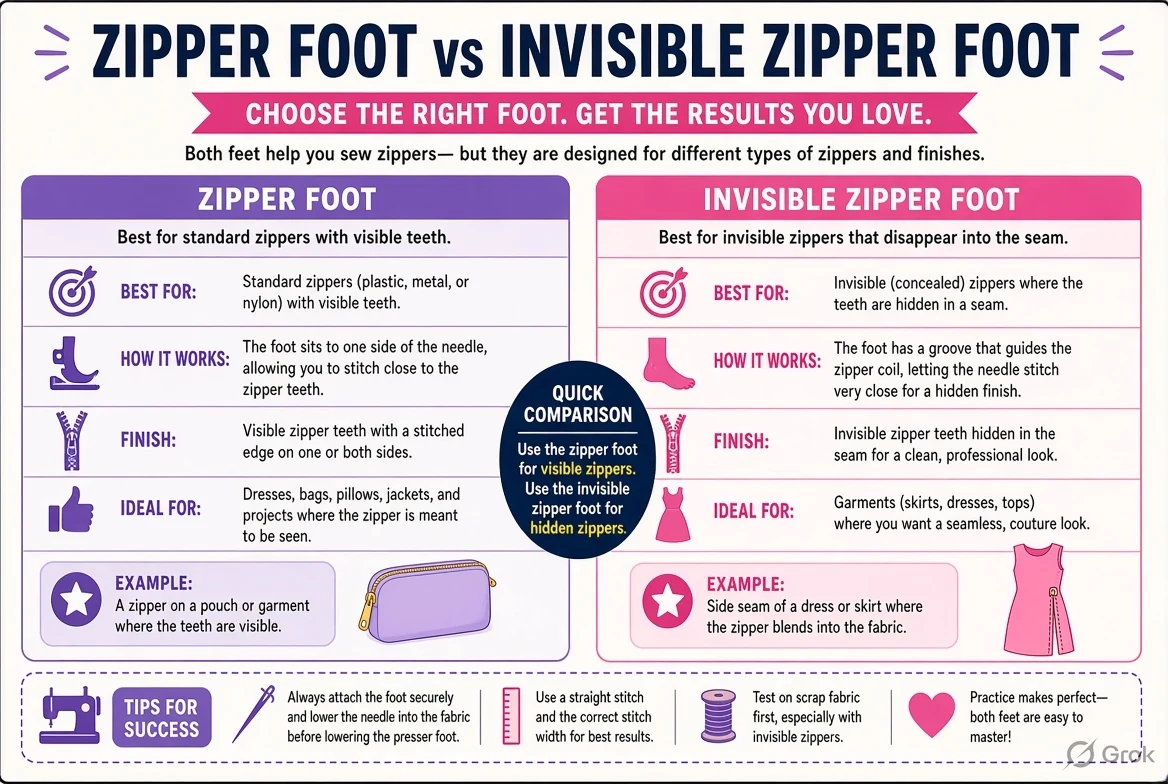
A standard or all-purpose presser foot is the starting point for everyday seams. Its broad, stable underside supports the fabric and its opening often allows a range of ordinary stitches. A regular zipper foot is narrower or offset so the needle can stitch closer to the zipper teeth without forcing the foot over the raised metal or plastic. Its left-right positioning options depend on the model, so verify the machine’s needle position and stitch width before sewing.
An invisible zipper foot usually has shaped grooves that roll the concealed zipper coil away from the stitch line as the needle approaches it. This differs from merely placing a regular zipper foot near the coil. The technique commonly requires opening the invisible zipper and stitching its two sides in a particular orientation. Practise on scrap fabric with the same zipper and check the finished seam before working on a garment.
Walking foot versus standard presser foot: when it helps
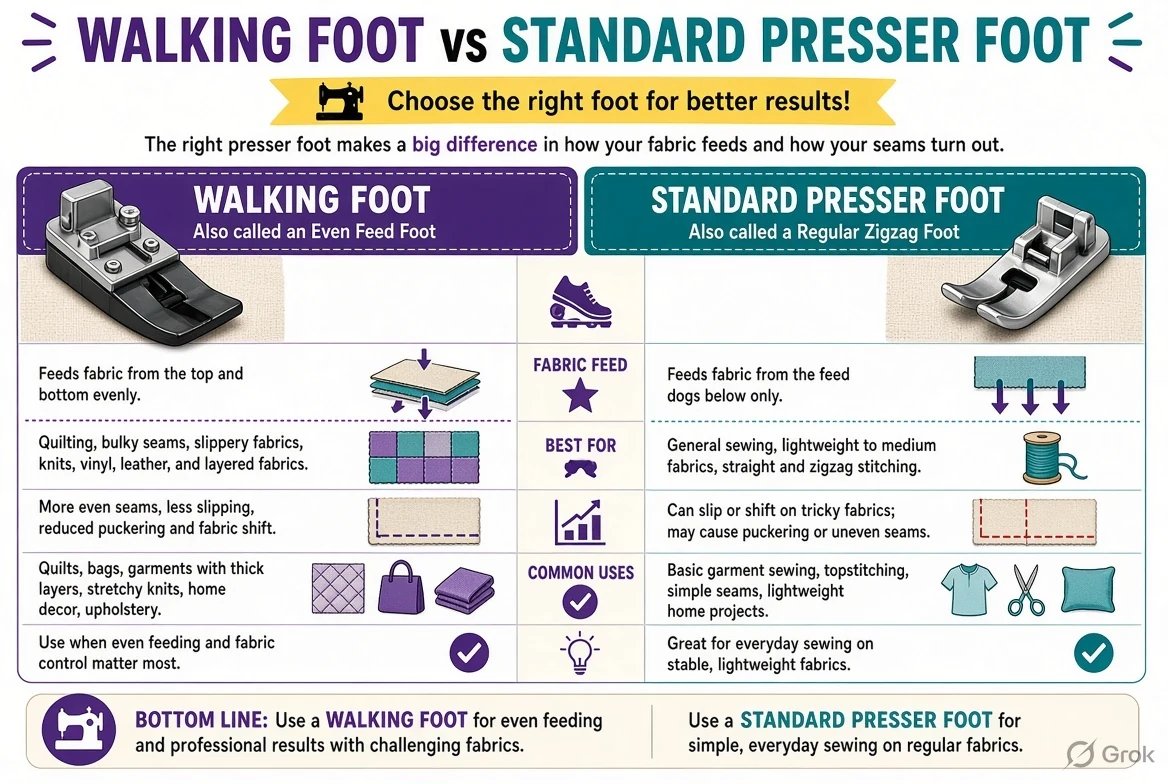
A walking foot, often called an even-feed foot, works with the machine’s feed system to help move upper layers of material more evenly. It is popular for quilting sandwiches, slippery fabrics, matching checks or stripes and some bulky projects where upper and lower layers tend to creep differently. Many home-machine walking feet use a mechanical arm that coordinates with needle-bar motion, while other machines offer integrated dual-feed mechanisms.
Do not treat it as a guarantee against puckering or skipped stitches. The correct needle, fabric stabilisation and moderate sewing speed still matter. Walking feet can have restrictions on stitch selections and maximum width; consult the accessory instructions. If the attachment uses an arm, make sure it is installed in the intended position before turning the handwheel. For some machines a built-in dual-feed foot is the better compatible option.
Overcasting foot and blind hem foot: edges and hems
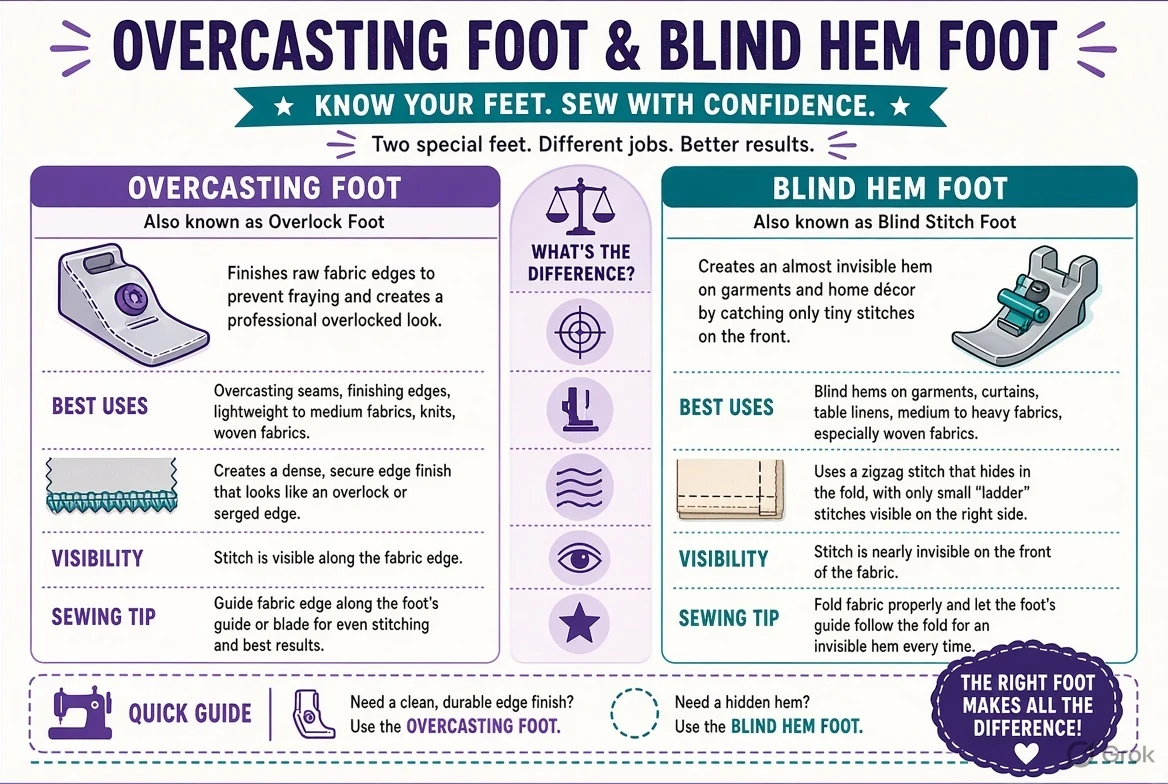
An overcasting or overedge foot guides fabric close to the edge while an appropriate zigzag or overedge stitch wraps thread over or near the raw edge. Some versions have a centre bar that helps control stitch formation. It is not the same as a dedicated overlocker/serger, which may trim fabric and form different stitch structures. Follow stitch instructions precisely and avoid a needle collision with any central guide.
A blind hem foot has a guide that helps keep folded hem fabric at a consistent relationship to the needle, so the needle catches only a small portion on the right side when the blind-hem stitch is used correctly. It is helpful for trousers, skirts and curtains that need a discreet finish. Folding and ironing the fabric correctly is as important as the special foot. Test the fabric fold and needle swing on a spare piece first.
Buttonhole foot: one-step and four-step differences
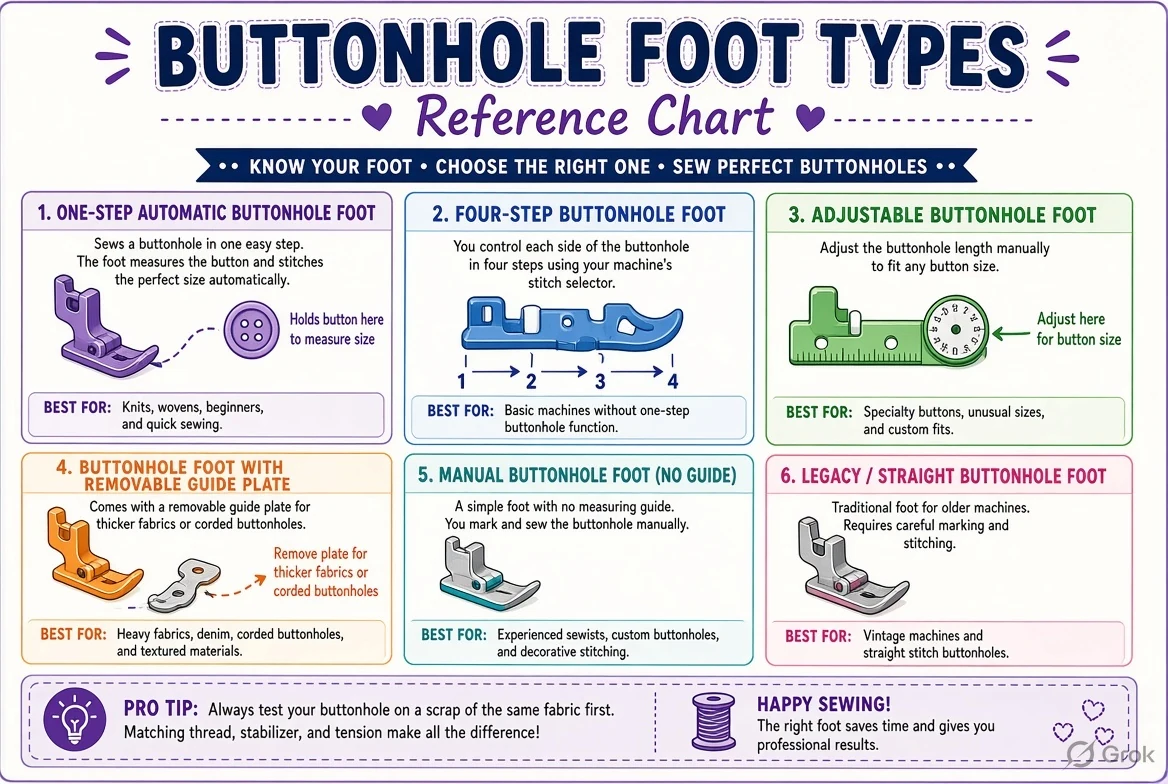
A buttonhole foot may be a simple rectangular guide for manual or four-step buttonholes, or a longer sliding foot designed for a machine’s one-step automatic buttonhole function. Some systems hold the button within the foot or use a sensor arrangement to determine length. The printed foot style alone does not show whether your machine supports that automatic function. Check the model-specific buttonhole instructions and available stitch programmes.
Mark the buttonhole position and test on fabric with the same interfacing, thread and thickness as the garment. A clean buttonhole depends on stabilisation, suitable needle choice and controlled stitching as much as the attachment. After sewing, open the slit using an appropriate cutting tool with care, protecting the end bars from accidental cutting. The best buttonhole foot is the compatible one matched to your machine and intended stitch method.
How to tell whether a new foot fits your sewing machine
Machine feet vary by brand, presser-foot holder geometry, shank height, snap-on adapter, screw mounting and needle-position constraints. ‘Universal’, ‘low shank’ and ‘snap-on’ are useful shop terms but not proof that a specific accessory works with every model. Some brand families use proprietary mounting systems, and even within a brand, older and newer models may differ. Use your model number and the manufacturer’s compatibility table before buying or attaching accessories.
To check, turn off the machine, remove the old foot as directed, and inspect whether the replacement sits securely on its intended mounting. With the needle raised, turn the handwheel slowly by hand to confirm the needle will not strike metal or plastic. Do not run the motor at speed until you know the stitch opening and needle position are compatible. If the needle touches the foot, stop and correct the setup.
Use our four presser-foot charts without confusing similar parts
The first diagram compares ordinary zipper and invisible zipper feet. The second shows walking foot versus general presser foot. The third contrasts overcasting and blind-hem guides. The fourth shows common buttonhole foot styles. Photos and outlines are useful for recognising a task-specific shape, but the exact accessory number and compatibility list still control installation.
A useful sewing-kit notebook has columns for foot name, what it does, recommended stitch, machine model and common mistakes. For instance, a blind-hem foot needs a blind-hem stitch and a deliberate fold, whereas a zipper foot benefits from a suitable straight-stitch position. Recording these combinations is far more helpful than simply owning a large collection of feet without knowing the matching techniques.
Beginner practice: six fabric samples before a real project
Begin with two layers of ordinary cotton and sew a straight seam using the general-purpose foot. Next practise joining fabric beside a standard zipper with a zipper foot, then try an invisible zipper on a separate sample. Third, sew several layers together and compare whether your walking foot produces more even feed. Fourth, finish a raw edge with your overcasting foot and the stitch specified in your manual.
Fifth, fold and press a blind hem and test the resulting stitch. Sixth, make sample buttonholes in stabilised fabric and compare their lengths. Keep the samples labelled with needle type, foot and stitch settings. If a foot changes how your machine feeds or forms stitches, test again on scrap before touching a finished garment. This small practice set turns a visual accessory chart into practical sewing knowledge.
Which presser foot for which project?
| Foot | Main purpose | Remember |
|---|---|---|
| General-purpose | Straight and common utility seams | Use suitable stitch clearance |
| Zipper | Stitch beside exposed zipper teeth | Check left/right needle position |
| Invisible zipper | Guide hidden zipper coil | Practise coil opening on scrap |
| Walking | Help feed fabric layers evenly | Match machine’s walking mechanism |
| Overcasting | Guide raw-edge finish | Stitch must clear centre guide |
| Blind hem | Keep folded hem aligned | Correct folding is essential |
| Buttonhole | Guide buttonhole stitching | Verify one-step or four-step system |
Frequently asked questions
What is the difference between zipper and invisible zipper feet?
The invisible-zipper foot has guides designed for concealed zipper coils; a standard zipper foot works close to ordinary zipper teeth.
Is a walking foot good for quilting?
Often yes, especially when moving layered fabric evenly, if it is compatible with the machine.
Does an overcasting foot turn a sewing machine into an overlocker?
No. It guides an edge stitch but does not replicate every overlocker function.
Can any snap-on foot fit any sewing machine?
No. Shank, holder, machine model and stitch-width clearance all require confirmation.
Do I need a buttonhole foot for a one-step buttonhole?
Use the foot and sensor arrangement required by the machine manufacturer.
Which foot is best for blind hemming?
A compatible blind hem foot with an appropriate blind-hem stitch and fabric fold.
Conclusion and references
Choose a presser foot first by task, then confirm the exact machine-compatible mounting and needle clearance. Keep a small fabric sample with the foot, stitch and needle details for each technique.
- BERNINA presser feet and machine accessories
- BERNINA accessory guide
- BERNINA machine instruction references

















Share Your Opinion
Comments are closed on this post.