 Vista
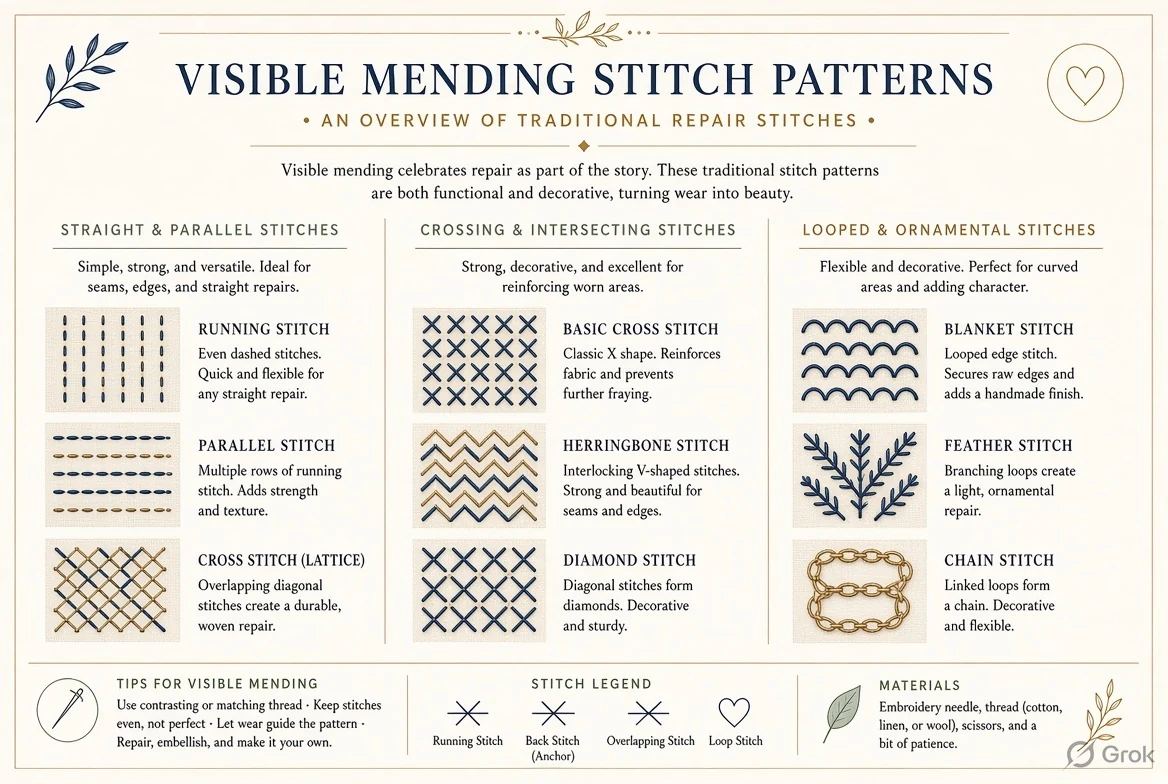
Direct answer: Visible mending is the practice of repairing a damaged garment in a way that intentionally leaves the repair visible. A running-stitch grid can reinforce weak woven fabric; darning replaces missing woven threads over a hole; and a Sashiko-inspired patch can combine structural support with decorative embroidery. They are different repairs, not interchangeable names for the same stitch. This guide offers three illustrated pattern references and explains how to assess damage, choose a backing, keep stitches comfortable and avoid treating decorative thread as a substitute for a strong repair.
Updated 20 November 2026. Repair illustrations are educational guides; choose methods according to actual fabric damage.
Visible Mending Pattern Chart: quick reference
| Repair styles | Running-stitch reinforcement, decorative darning, patch repair |
|---|---|
| Best for grid stitching | Stable woven fabric such as denim or canvas |
| Best for darning | Small holes where the missing fabric can be rebuilt |
| Sashiko connection | Running-stitch tradition; modern visible mending often draws inspiration |
| Important strength point | Anchor repairs into sound fabric beyond the damaged area |
| Charts here | Three reference images; no separate downloadable verified template |
Three visible mending repair patterns
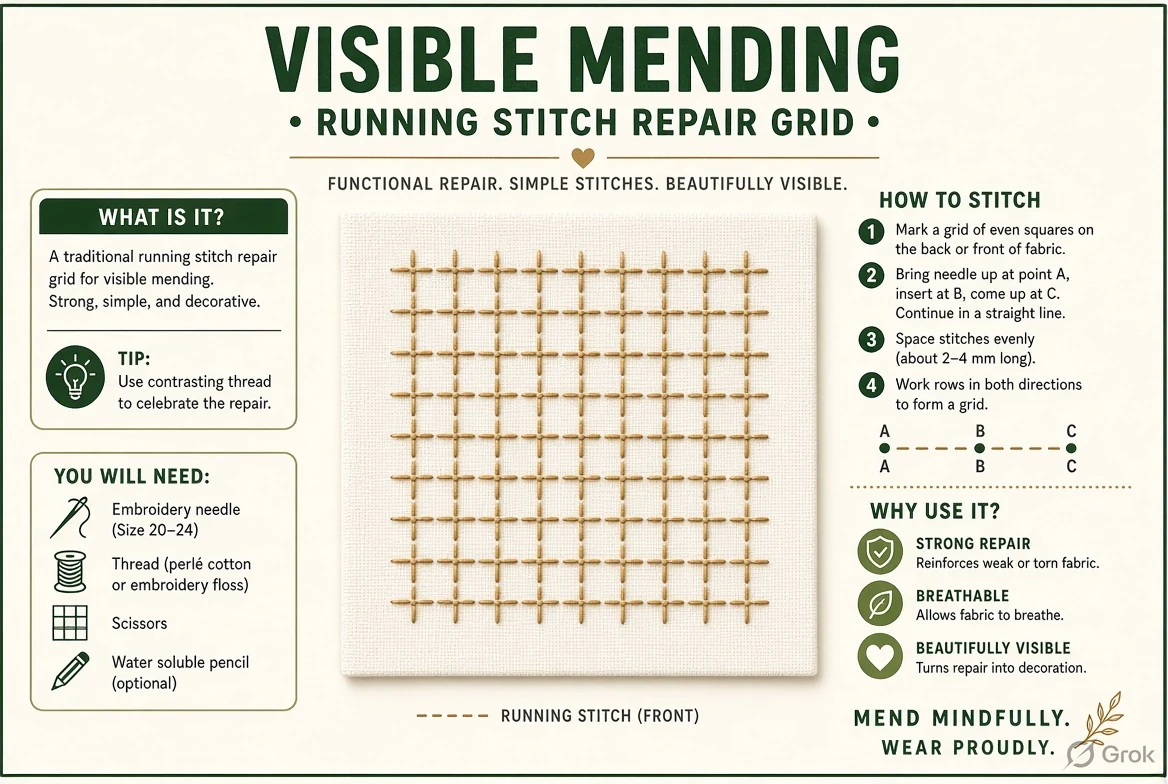
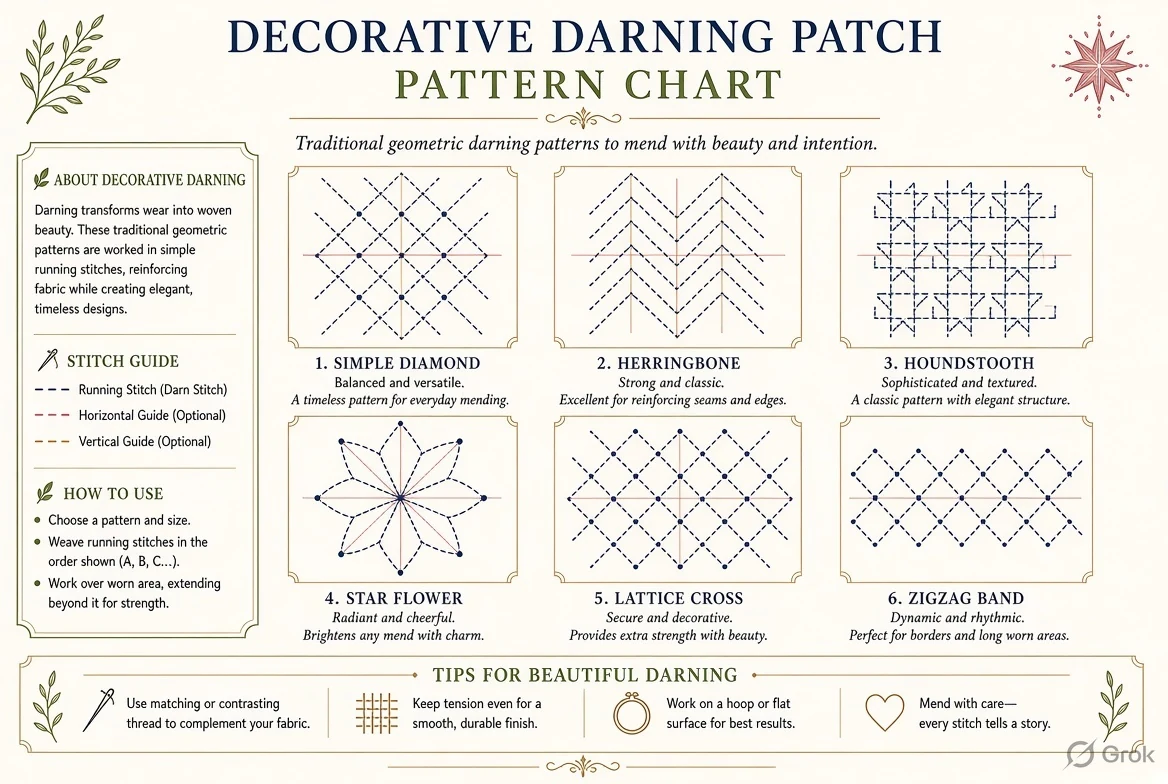
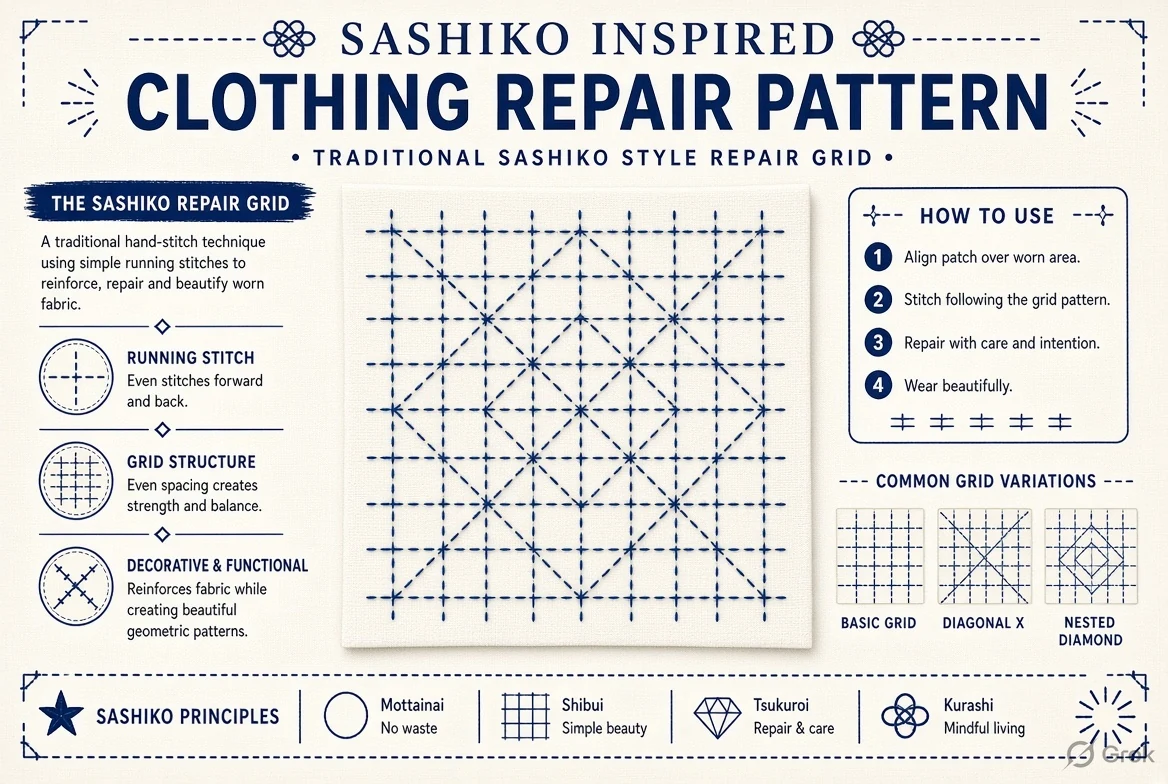
What is visible mending, and when does it work best?
Visible mending turns clothing repair into a clearly seen design choice. Instead of hiding the seam, a repair may use contrasting thread, a colorful patch or a deliberate stitch grid. The method can extend a garment’s useful life, although the strength depends on whether the damaged textile is actually reinforced. It works best when the surrounding fabric is still sound enough to hold stitches. A heavily worn seam, fragile elastic knit or garment under constant high stress may need more extensive professional repair or replacement. The right first step is to examine the cloth, not to copy the prettiest stitch chart.
How to inspect a worn area before choosing the pattern
Lay the garment on a flat surface in good light and check the visible hole plus the larger surrounding weak patch. Fabric may be translucent, fraying or thin beyond the center. Gently stretch it to see where fibers separate. Mark the boundary of the wear with a temporary fabric-safe method. For a pocket or knee, consider how the area moves when worn. If the fabric is still mostly intact, running stitches may help stabilize it; if material is missing, add backing or use a darning approach suited to the cloth. Repair over strong fabric, not only over the torn edge.
Running-stitch repair grid: the basic technique
Running stitch passes a needle in and out through the fabric, creating repeated short visible marks. For a simple visible mending grid, make parallel lines spanning beyond the weak area into sound cloth. Space them evenly and avoid pulling so tight that the fabric puckers. A crossing second direction can add stabilization depending on the textile and repair plan. Use a needle and thread weight suitable for denim, cotton or another woven cloth. A decorative grid that sits only on a hole and has no backing does not magically replace missing fabric. A sturdy patch beneath the damage is often the better starting point.
Darning chart: how missing fabric can be rebuilt
Darning is more than decorative embroidery. It recreates an interlaced structure by stretching a series of parallel yarns across a hole and weaving another set under and over them. A darning mushroom or smooth support beneath socks and knitwear can make the work easier. Choose yarn thickness and elasticity close enough to the original fabric; a stiff repair on a stretch sock may rub or tear again. For a small hole, begin your anchoring stitches in sound material beyond its edges. Build the warp-like foundation, then weave back and forth carefully. A chart helps visualize the order, but actual tension must be adjusted by hand.
Sashiko-inspired repairs and what makes them distinct
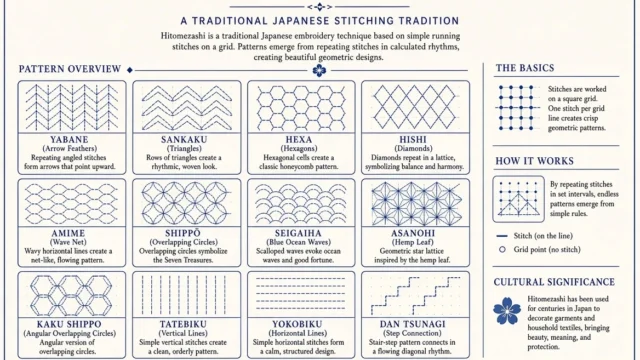
Sashiko is a Japanese running-stitch textile tradition with its own history, materials and methods. Contemporary visible mending often borrows the look of contrasting Sashiko patterns to secure a backing patch, especially on denim. Calling a repair Sashiko-inspired is more accurate when it adapts the appearance without claiming to reproduce a specific historical technique. Place a patch large enough to extend beyond the weak cloth. Then make a repeat of small stitches that pass through both layers as planned. Leave slight give for movement rather than making the knee panel stiff and tight. Decorative stitching can help stabilize, but fit and backing remain essential.
Choosing between a patch, darning and embroidery
A woven cotton knee with thinning fabric may benefit from a patch held down by rows of running stitch. A wool sock with a small hole may be better darned to rebuild missing fibers, though thick yarn can be uncomfortable inside shoes. A frayed hem needs an edge repair rather than an ornamental central motif. If a seam has split but fabric is otherwise strong, resewing the seam is the more direct fix. Use an embroidery cover-up when the garment’s structure is already safe and you want a decorative finish. Matching the repair to the damage makes the result more durable than choosing a pattern by appearance alone.
Thread, needle and backing materials checklist
Gather a suitable needle, thread or embroidery floss, scissors, a ruler, removable marker and backing fabric when needed. Choose a backing that moves reasonably like the garment and is large enough to cover more than the damaged center. On denim, a compatible woven patch can support the weakened fibers. On stretchy knitwear, a rigid cotton rectangle may pull awkwardly; a different repair method is often needed. Avoid very thick decorative thread for areas rubbing against skin. Test colorfastness before laundering contrasting yarns. The repair should feel comfortable when touched and allow the garment’s intended movement.
Step-by-step first visible mending project on denim
Begin with a clean, dry pair of jeans and turn the garment so you can inspect both sides. Mark the thin area and cut a backing patch that extends into solid fabric. Position it under the damaged section, temporarily hold it in place and check how it looks from the front. Use running-stitch rows that pass through the outer denim and backing, starting beyond the weak zone. Add a second direction if needed for support. Secure thread tails neatly on the reverse. Remove temporary markings according to their instructions and try the jeans on before deciding whether the stitch spacing feels comfortable around the knee.
How to use the pattern chart and transfer lines
The included pictures are diagrams, not guaranteed scale-accurate printable templates. Decide the desired size of the repair and draw a simple repeat to that measurement. If you print an image, check print preview and measure a known interval with a ruler. Transfer the grid with a fabric-safe marker, working from a straight edge so parallel lines remain aligned. Around an irregular tear, the boundary can be more important than perfect symmetry. Label a stitch route if the diagram has several passes. A neat drawing can become uncomfortable if it locks all the fabric into a stiff region, so test a small sample of the chosen stitch density first.
Tension, comfort and durability checks after repair
A successful mend lies reasonably flat, does not catch the skin and does not distort the garment’s shape. Examine the reverse for long thread floats that could snag while dressing. Gently flex the repaired section and see whether stitches strain at the boundaries. If the garment pulls tight, reduce stitch density or loosen the tension rather than adding more rows. Wash according to the weakest material in the repair, not just the original care label. After a few wears, inspect the edges for new fraying. Repairing early can be easier than trying to restore an area where nearly all fabric has worn away.
Mistakes to avoid and the sustainability angle
Common errors include placing stitches only through worn fibers, using a tiny patch over a much larger weak area, choosing rigid thread for stretchy cloth and describing any decorative grid as an authentic traditional Sashiko pattern. Visible mending can reduce unnecessary disposal when the garment remains safe and useful, but there is no universal guarantee of lifetime extension. Some heavily damaged areas require more than surface embroidery. Value the practical repair first and the appearance second. A visually bold patch is successful when it helps the owner keep wearing the garment comfortably, not merely when it looks good in a photograph.
Next keywords and practical repair questions
Readers may next search ‘visible mending patterns printable’, ‘sashiko jeans repair tutorial’, ‘running stitch repair grid’, ‘decorative darning pattern’, ‘how to mend a hole in denim’ or ‘visible mending vs darning’. These are sensible reader-intent ideas, not measured search volume. The best follow-up depends on whether a person has thinning denim, a missing-fabric hole, a torn seam or a knit sock. A useful picture chart is only the start: the proper repair must be selected after looking at the actual clothing, stitch direction and backing material.
Frequently asked questions
What is visible mending?
A clothing repair intentionally made visible through decorative thread or patches.
Can running stitch repair a hole by itself?
It may reinforce thinning fabric; missing material often needs backing or darning.
Is visible mending the same as Sashiko?
No. Some modern repairs are Sashiko-inspired, but Sashiko is a distinct Japanese stitch tradition.
What does darning do?
It rebuilds a textile surface by interlacing replacement threads across a damaged area.
Can I use a visible mend on jeans?
Yes, particularly with suitable backing and stitching into sound denim.
Are these scale-tested free PDFs?
No. The three visuals are reference charts rather than separate tested PDF downloads.
Sources and conclusion
Practical repair references: DMC mending patterns, Visible mending patch planning. Related published reading: Crochet patterns for beginners. A structurally useful repair starts with inspecting the entire weak area, not merely copying a decorative motif.

























Share Your Opinion
Comments are closed on this post.