 Vista
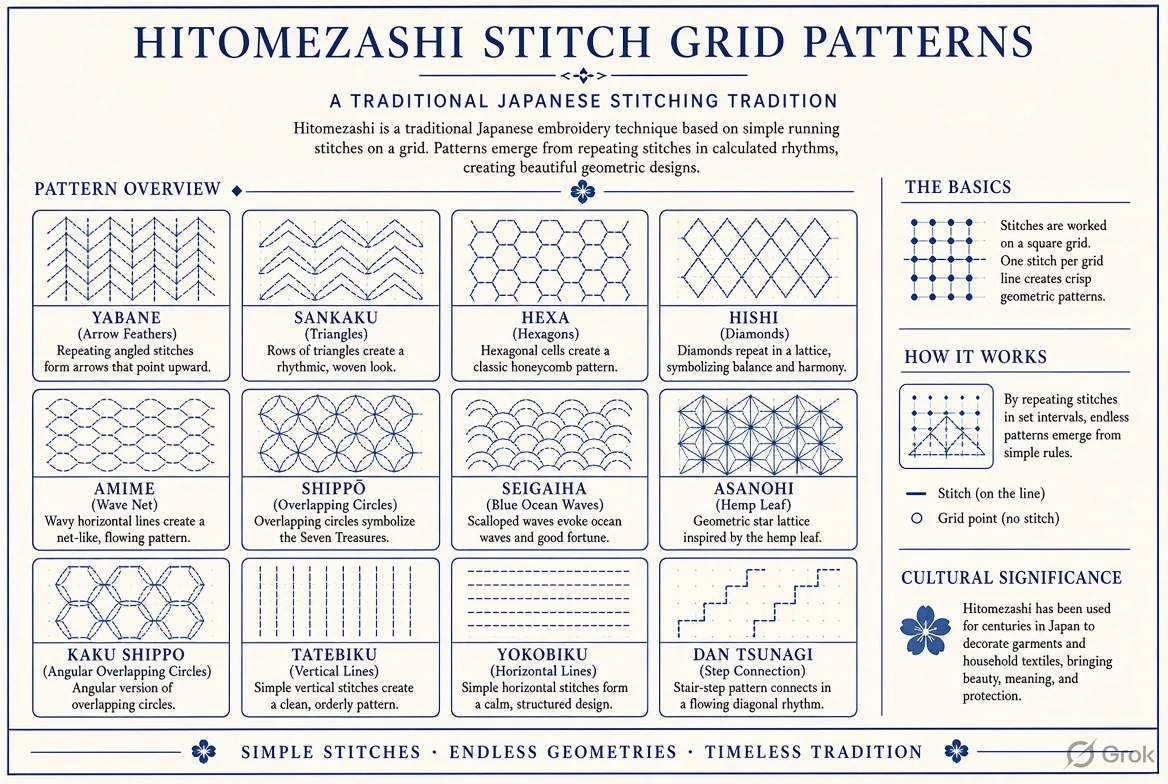
Direct answer: Hitomezashi means ‘one-stitch Sashiko’: a Japanese embroidery approach that builds repeating designs from individual short running stitches arranged on a grid. Unlike moyozashi, where the stitches follow longer motif lines, hitomezashi designs appear as rows and columns of simple stitches interact. This visual guide brings together a checkered grid, diagonal-look design, cross-style grid and color sequence chart. The artwork is educational reference material, not an independently available printable PDF; use its logic to plan your own countable stitch layout and check the scale before printing.
Updated 20 November 2026. Visual stitch and braid charts are educational references; a separately downloadable print-verified PDF is not claimed.
Hitomezashi Stitch Grid Patterns: Printable One-Stitch Sashiko Charts & Color Ideas — quick reference
| Japanese term | Hitomezashi (one-stitch Sashiko) |
|---|---|
| Basic unit | Short running stitch placed on a consistent grid |
| Common appearance | Dense checkered, interlocking or woven geometry |
| Different from | Moyozashi line tracing and counted cross-stitch |
| Main challenge | Keeping the grid and row offsets consistent |
| Images provided | Four reference grids, including a color layout |
Illustrated pattern charts and reference grids


What is Hitomezashi, and why is it called one-stitch Sashiko?
Hitomezashi is a way of organizing short running stitches so that each stitch occupies a regular interval of the grid. As more rows or columns are worked, their relative positions create an interlocking visual structure. The technique is often associated with dense repeated patterns that seem almost woven from a distance. It is related to the broader Japanese Sashiko tradition but not the same thing as all Sashiko embroidery. A grid chart is valuable because the placement is deliberate: one skipped position can shift a repeating pattern. The chart should explain a row or column’s logical start, not simply display a decorative surface without instructions.
Hitomezashi versus Moyozashi: visual difference in practice
Moyozashi patterns trace pre-drawn lines, which can curve to form waves or interlocking circles. Hitomezashi patterns are assembled from many single grid-unit stitches, commonly arranged in straight lines. A finished hitomezashi piece can display diagonals, diamonds or checks even when the underlying stitches are made in horizontal or vertical rows. This distinction is useful for learners trying to copy an image: a curve-following Sashiko template cannot be converted into a one-stitch grid simply by changing the font or paper background. First decide how the motif is actually constructed and then choose an appropriate chart.
How to mark a consistent one-stitch grid on fabric
Choose a plain woven fabric that does not distort easily, a safe removable fabric marking method and a ruler. Draw evenly spaced horizontal and vertical guidelines as your working reference. The actual spacing depends on material, desired pattern density and the thickness of the thread; a tiny internet photo provides no reliable physical scale. Start with a small patch of perhaps a dozen squares across and test how the needle and thread behave. If the cloth pulls inward after one row, loosen tension or adjust spacing before extending the design. Mark all repeat boundaries and a visible start point to prevent becoming lost in a dense grid.
Reading the Hitomezashi checkered stitch pattern chart
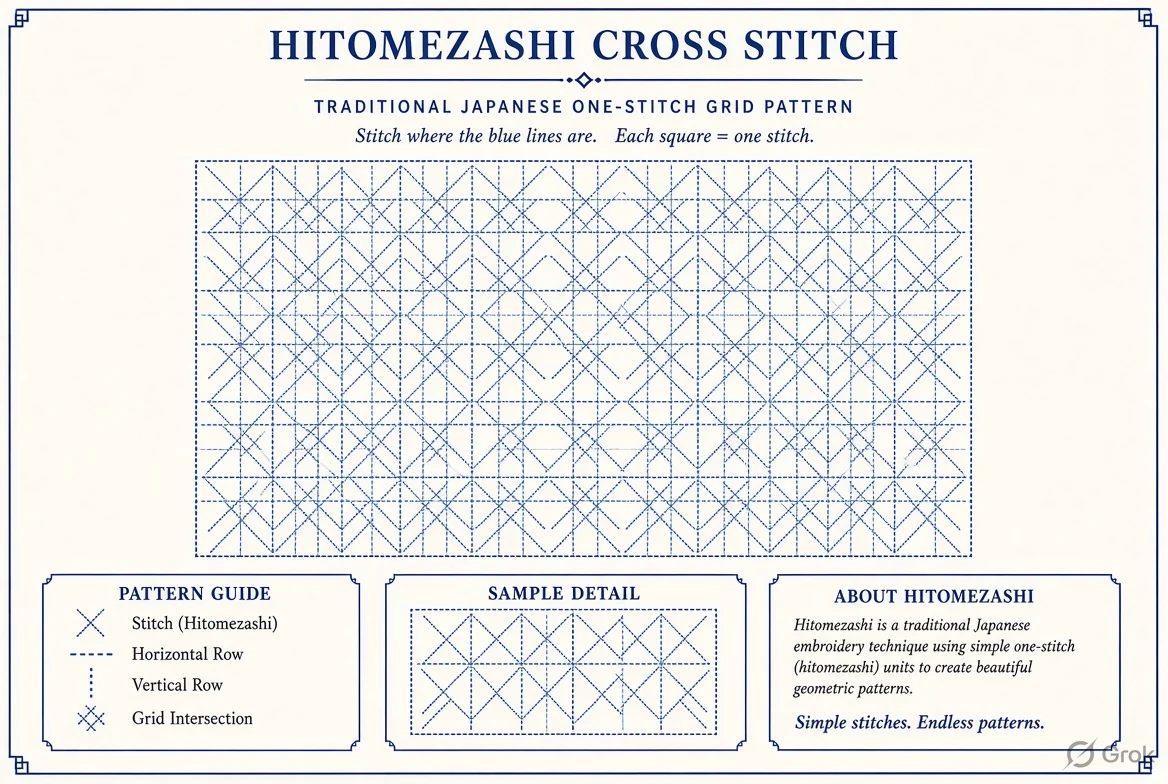
In a checkered pattern, alternating stitched and unstitched grid positions produce a regular surface. The visual effect often changes when another pass is added in a crossing direction. Count each short visible running stitch as one unit rather than assuming that a solid line drawn across five squares is one enormous stitch. Check every second row’s offset: the same marks repeated in exactly the same position can create stripes rather than checks. For a beginner, trace the first line with a contrasting pencil on the paper chart, then mark the next row’s starting cell. This simple practice prevents a long repair session after the fabric has already been stitched.
Diagonal-looking geometry from straight stitch sequences
A diagonal shape can arise from a staircase of short stitches shifted by one or more grid spaces on successive rows. The final design may look like chevrons or diagonal bands even when no long diagonal stitch is sewn. That is one reason counted-grid embroidery is visually satisfying: small local rules generate more complex patterns. However, the exact order of passes depends on the chosen diagram, so do not assume every decorative diagonal picture represents the same traditional hitomezashi pattern. Use a high-contrast color for planning and check that the shape returns to its starting offset at the end of each repeat.
Why cross-style hitomezashi is not automatically cross-stitch
Some hitomezashi grids create little crosses or intersecting bars in the finished appearance. This does not make them identical to counted cross-stitch, where an X is typically constructed from diagonal stitches. Hitomezashi usually relies on the regular one-unit running-stitch method, sometimes with stitches meeting or crossing in distinctive ways. When a picture is captioned ‘hitomezashi cross stitch grid’, look at the actual needle direction and number of passes instead of trusting the headline. Students who confuse the techniques may produce a beautiful result but not the structure the chart intended. A clear tutorial should identify the stitch type before introducing color.
Color sequence charts: planning two-color and multicolor effects
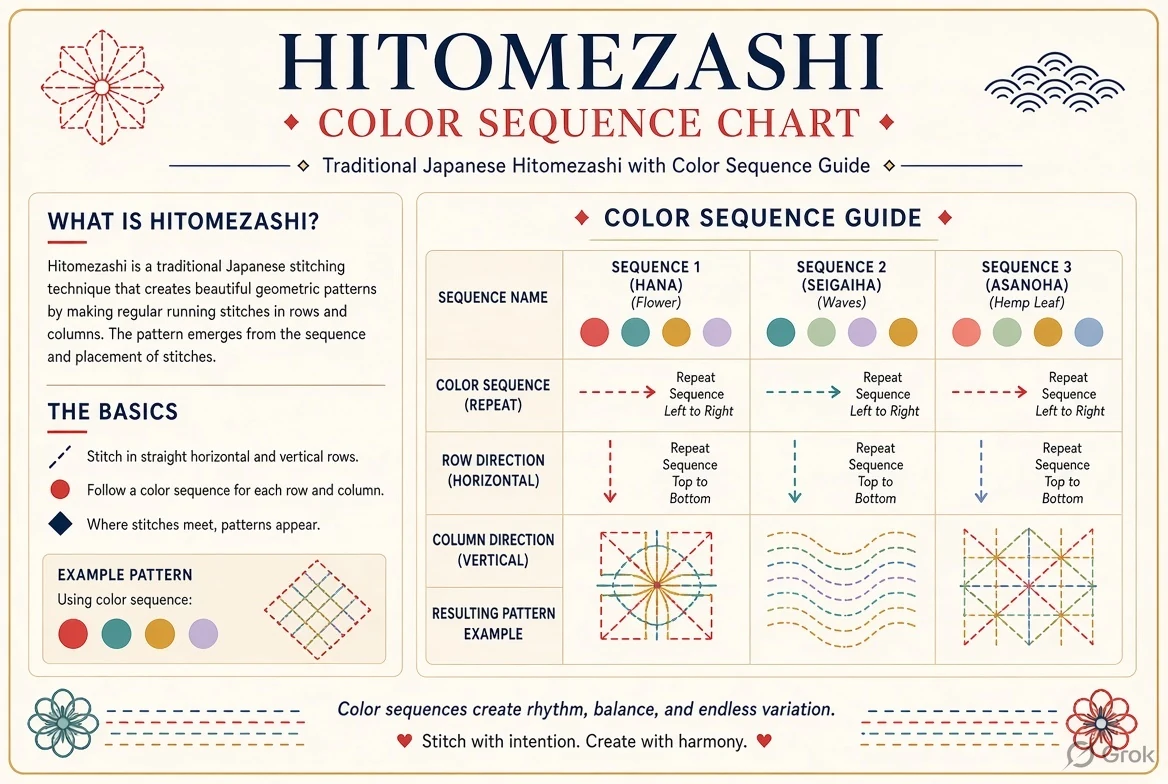
Changing thread color between rows or groups can reveal the same geometric grid in different ways. A color-sequence chart should show both the position of a stitch and the assignment of a color to a row, column or section. Use a small numbered legend, because color alone is hard to distinguish in grayscale printing and for some readers. Keep at least one practice swatch with the same fabric and thread so you can compare the visual contrast. Do not assume that changing every strand at random will retain the motif’s symmetry. For a two-color design, work out the repeat on paper first and label the boundaries.
How to transfer a hitomezashi chart onto fabric
Decide the physical size of a grid square before printing or tracing. An unscaled web diagram may be distorted when the browser fits it to a sheet, so use a print preview and measure one reference interval afterward. Some stitchers mark the entire set of lines, while others use a washable grid and count stitches as they go. Either approach should preserve even spacing and a clear orientation. Use the chart as a guide, not a guarantee that every screenshot is engineered for direct stitching. If you need a specific stitch count for a finished item, make a new countable template whose repeat length you have confirmed.
Beginner workflow: first practice swatch from start to finish
Cut and prepare a small piece of stable cloth. Mark the grid and a first row’s start point. Thread a needle, tie off according to your preferred embroidery method and begin with controlled running stitches across the line. Return with the next row following the marked offset. After several rows, turn the fabric and check the underside for long floats or snagging loops. Keep the cloth relaxed; pulling it tightly will change the grid geometry. Work a small second direction if the chosen pattern requires it, observing whether crossings meet cleanly. Photograph the swatch from a normal viewing distance so the repeat is easy to judge.
Common mistakes: miscounted rows, tension and skipped cells
The most costly error is a row that begins one square off. Because a hitomezashi repeat is cumulative, the mistake spreads into a much larger visible area. Another issue is uneven tension: a perfect paper grid can become distorted when each stitch is pulled too tight. Tiny stitch lengths can also make a design stiff on fabric intended to bend or drape. Check each row’s first few units before completing the whole line. If a pattern appears wrong, compare it with the chart row by row rather than ripping out the entire piece immediately. Countable, localized corrections are much easier.
Printing and accessibility: what ‘printable’ means here
This article includes four reference images, and readers may use normal browser print or save-as-PDF tools where supported. It does not claim a separately hosted, engineered PDF download. A true-scale pattern should have a declared grid spacing and a tested physical size, which a casual web image cannot guarantee. If you make your own worksheet, include row and column labels, orientation, and a color legend that also works without color. Avoid thin marks that disappear when printed in grayscale. Descriptive image alt text should state the motif and construction method rather than simply ‘beautiful embroidery design’.
Next keywords and questions that lead to better projects
Useful reader follow-ups include ‘hitomezashi patterns printable’, ‘one stitch sashiko grid’, ‘hitomezashi checkered chart’, ‘hitomezashi versus moyozashi’, ‘hitomezashi two color stitch pattern’ and ‘hitomezashi step by step’. These are ideas for what a learner may need next, not invented Google search volumes. An effective hitomezashi article should answer the question behind the term: do they want a design to admire, a chart to trace, a stitch-by-stitch route or a finished project plan? This page focuses on the reference charts and the technique needed to use them responsibly.
Frequently asked questions
What does Hitomezashi mean?
It means one-stitch Sashiko, a grid-based Japanese running-stitch technique.
Is Hitomezashi the same as cross-stitch?
No. Cross-like visual motifs can appear, but the basic stitch construction differs.
How is Hitomezashi different from Moyozashi?
Hitomezashi places one-unit stitches on a grid; Moyozashi traces larger pattern lines.
Can I use two thread colors?
Yes. Use a consistent row or column color plan so the intended repeat stays readable.
Are the four images a ready-to-print PDF?
They are reference images; physical print scaling must be checked before use.
Why do Hitomezashi rows look diagonal?
Offsets across successive straight rows can create a diagonal-looking overall motif.
Sources, related reading and conclusion
For practical terminology and instructions, see Research discussion of one-stitch Sashiko and Sashiko technique overview. For more craft project ideas, visit our Beginner crochet patterns and chart basics. Test each pattern on a small sample before a full-size project, and distinguish diagram reference from tested construction instructions.











Share Your Opinion
Comments are closed on this post.