 Vista

Direct answer: Kumihimo is a Japanese braid-making tradition using carefully ordered moves of multiple threads. A beginner can make an eight-strand round cord on a slotted foam disk, while sixteen-strand and flat-braid layouts require different strand plans. Here are four illustrated Kumihimo braiding pattern charts: 8-strand setup, 16-strand color arrangement, round-braid step sequence and flat braid ideas. The central lesson is that a color-placement diagram does not by itself explain the complete braiding sequence. Use the correct strand count, consistent movements and measured tension to reproduce a pattern.
Updated 20 November 2026. Visual stitch and braid charts are educational references; a separately downloadable print-verified PDF is not claimed.
Kumihimo Braiding Pattern Charts: 8-Strand Round, 16-Strand Color & Flat Braids — quick reference
| Craft | Japanese thread or cord braiding |
|---|---|
| Beginner setup | Eight cords on a marked round disk |
| Common round example | Kongō gumi style braid |
| Other visuals | Sixteen-strand layout and flat-braid reference |
| Essential tools | Slotted disk, cords, clips/bobbins and a small center weight |
| Important limitation | Illustrations are guides, not audited slot-by-slot full templates |
Illustrated pattern charts and reference grids


What is Kumihimo braiding and what does a pattern chart do?
The word Kumihimo refers to the Japanese practice of creating cords or braids by crossing strands in a repeated order. A braid’s shape emerges from the movement sequence, while its visible stripes and diamonds depend partly on the initial colors and thread placements. Historical braiding tools include wooden stands such as marudai, but modern beginners often use a portable slotted disk. A pattern chart can show the starting configuration, the thread colors or the next movement; these are different kinds of information. A trustworthy guide labels which kind it is and avoids implying that a finished-color preview alone is a complete construction recipe.
Supplies for a first eight-strand Kumihimo braid
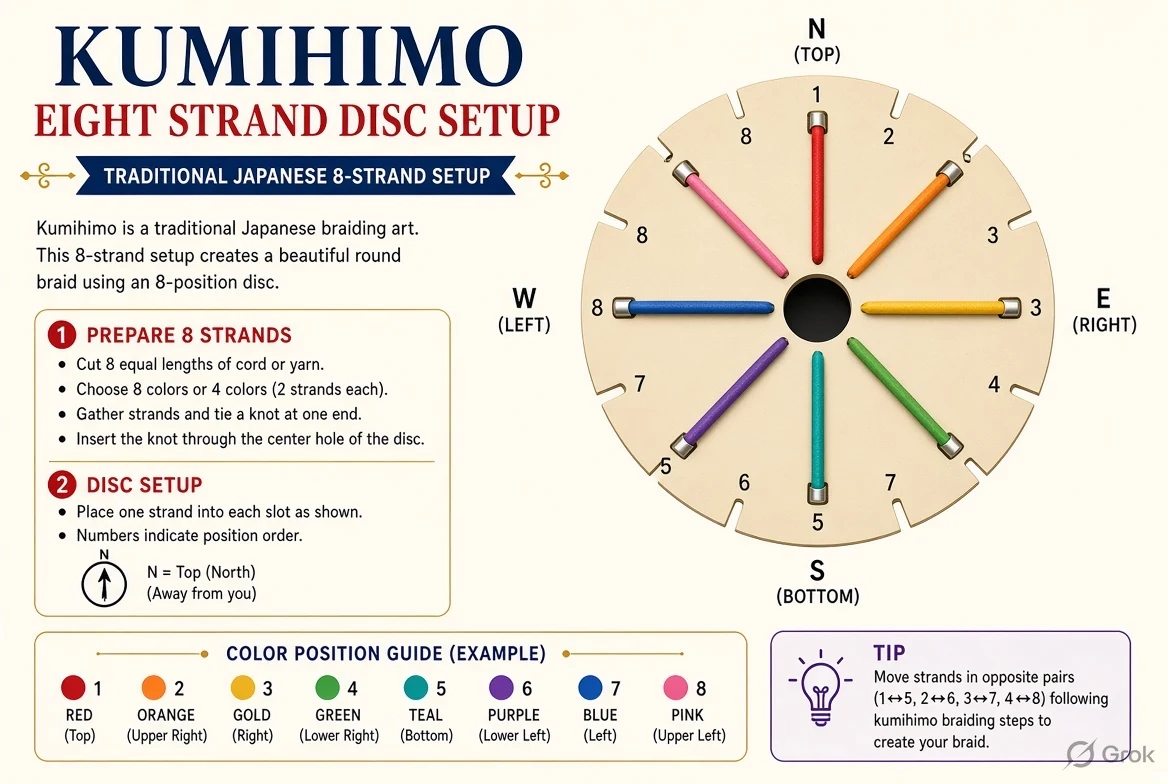
For a simple practice braid, prepare a round slotted disk, eight lengths of smooth cord, a way to keep loose ends tidy and a small hanging weight beneath the center. A foam disk is a popular inexpensive practice tool, and thread bobbins help control tangling. Select cords of similar thickness so the finished braid sits evenly; mix yarn types only once you understand their tension. Check the disk for numbered slots or cardinal markers. You do not have to buy a large wooden braiding stand to learn the basic round pattern, but a disk chart assumes a specific orientation that should remain consistent throughout the project.
Eight-strand disk setup: two cords at four points
Gather the eight cords into a starting knot and pass the knot through the disk’s center hole so the working braid hangs below. Put two strands near the top marking, two near the bottom, two near the left and two near the right. Each pair should occupy separate neighboring slots rather than being piled into one notch. This makes four working pairs for the round-braid sequence. Color choice is best made before you begin: two colors placed opposite each other can form a different visible effect from the same colors placed next to each other. Use the eight-strand setup diagram to confirm each thread’s initial position before crossing any strands.
Round braid movement: top-right down, bottom-left up
A widely taught beginner round-braid method starts by moving the upper-right cord down to the right-hand free slot beside the bottom pair. Next move the lower-left cord up to the free left-hand slot beside the top pair. Rotate the disk one quarter-turn, keeping the chosen turning direction the same each time, and repeat the two moves. Keep a gentle pull on the braid beneath the central hole. The exact labels around another disk can differ, so pay attention to relative positions and use the matching setup reference. Stop after several cycles, let the cord hang and verify that its surface is even rather than forcing a stiff braid.
How cord color placement affects Kumihimo stripes
The braid sequence may stay identical while the design changes dramatically with the starting position of colors. For a beginner, a two-color layout makes it easier to see which direction each cord travels. Before cutting a longer project, make a short sample with the proposed color order and label every strand in the starting disk diagram. Horizontal, spiral and diamond-like effects can depend on both technique and placement; do not promise an exact finished pattern solely from a decorative illustration that has not been physically tested. If a braid looks different from the preview, check the first strand arrangement before changing the repeated movement sequence.
Sixteen-strand Kumihimo color chart: more cords, different planning
A sixteen-strand layout gives additional opportunities for color combinations and braid structures, but it also changes the movement complexity and sometimes the tool requirements. The sixteen-strand chart here is a color-organization reference, not an instruction to repeat the eight-strand moves with twice as many cords. The exact braid family—round, hollow, flat or another structure—must be selected before choosing slot movements. It is useful to identify the starting slot of each color and mark the next action on a separate practice sheet. The most reliable way to learn a sixteen-strand pattern is to follow a complete, tested sequence for that particular braid rather than infer it from a color wheel alone.
Round versus flat Kumihimo: different braid shapes
Round Kumihimo braids are often made on circular disks or traditional stands, while flat braid projects may use different tools, setups and movement sequences. A flat braid chart should show where its strands start and the crossing order that maintains a broad, ribbon-like structure. Simply pressing a round braid flat after finishing does not turn its underlying construction into a true flat braid pattern. The color stripes can also appear different on the face and reverse of a flat braid. For a project such as a bag strap or bookmark, decide on the shape first; that choice affects comfort, flexibility and the kind of end finishing needed.
Preventing loose spots: tension, rotation and tidy bobbins
Inconsistent tension produces a cord that narrows and widens along its length. Use a small appropriate weight under the disk and seat each pass gently instead of yanking the strands. Keep working ends on bobbins or clips so they do not wrap around one another. When the disk rotates, use a consistent direction and return to the same logical reference before moving the next pair. If you lose track, pause and check where each active cord is relative to the cardinal marks. Undoing two wrong moves is easier than trying to disguise the problem in the finished braid.
Planning bracelet, keychain and decorative cord lengths
Braiding consumes more cord than the finished braid length because strands travel diagonally and wrap around one another. The exact consumption depends on strand thickness, braid type, beads and tension. Cut a short test piece first, measure how much finished braid it makes and use that ratio for a longer project with a generous finishing allowance. A bracelet also needs space for a clasp or adjustable knot, while a keychain may need a loop and a secure end. If beads are included, string them onto the correct strands before starting if the selected method requires it. A chart without these practical measurements is incomplete for real-world project planning.
Using Kumihimo charts on a phone and in print
The most important feature of a Kumihimo chart is readable slot identity. A tiny image showing sixteen colored dots may look attractive but be impossible to follow when cords are moving. Zoom the first diagram, take a note of the starting positions, then keep one move sequence visible while you braid. A printout can be marked with pencil as you complete each cycle. If a browser scales an illustration, the slot number size may become hard to see, so check readability in print preview. This article does not promise a separate physical-size-tested PDF; the uploaded pictures are educational references and a planning aid.
Typical beginner errors and how to fix them
Common errors include moving the wrong member of a top or bottom pair, turning the disk inconsistently, mixing the color order at the start and allowing the hanging braid to twist without checking tension. Another frequent mistake is trying to apply a round-braid method to the flat design chart. When the surface pattern becomes irregular, stop after a small number of stitches and compare your live disk with the setup diagram. Do not keep braiding in the hope that it will self-correct. A beginner often improves fastest by making three short practice cords using the same move sequence and only changing the colors between samples.
Next search keywords and useful pattern questions
Potential follow-up searches include ‘kumihimo braiding patterns 8 strand’, ‘kumihimo round braid step by step’, ‘kumihimo disk setup printable’, ’16 strand kumihimo color patterns’, ‘flat kumihimo braid tutorial’ and ‘kumihimo braid thread length’. These phrases describe practical reader intentions and are not reported Google Trends volumes. Distinguish between a person who wants inspiration, a beginner who needs a valid strand movement sequence and someone who needs a tested color layout for a finished bracelet. This article introduces the basics and warns where the visual chart is only a reference rather than a fully tested weaving plan.
Frequently asked questions
What is Kumihimo?
A Japanese braiding practice that creates cords by moving multiple strands in organized sequences.
How many strands should beginners use?
An eight-strand round braid on a slotted disk is a common beginner starting point.
Is a 16-strand color chart enough to braid?
No. The specific sixteen-strand technique and movement order are also required.
Can I make flat Kumihimo on the same disk?
Some methods may use alternative tools or arrangements; a flat chart should be matched with its own method.
Why does a Kumihimo braid change thickness?
Uneven tension, mismatched cord sizes or inconsistent moves can cause variation.
Are these exact printable disk templates?
They are reference diagrams; check your disk markings and the proposed movement sequence.
Sources, related reading and conclusion
For practical terminology and instructions, see Eight-strand Kumihimo disk guide and Braiding technique overview. For more craft project ideas, visit our Crochet patterns for beginners. Test each pattern on a small sample before a full-size project, and distinguish diagram reference from tested construction instructions.












Share Your Opinion
Comments are closed on this post.