 Vista

Need a Moon Phases Wheel Model or solar and lunar eclipse pictures for a school project? This guide pairs two educational posters: a rotating wheel illustrating the Moon’s phases and a comparison of Sun–Earth–Moon positions during eclipses. Students in roughly Classes 5–10 can adapt them as paper crafts, A4 charts or classroom demonstrations. The distinction is important: ordinary lunar phases are not caused by Earth’s shadow. Phases depend on how much of the Moon’s sunlit half we see from Earth. Eclipses are special alignments, which do not happen every month. Each picture is available through a full-size link below its explanation.
The wheel shows the Northern Hemisphere orientation. In the poster, ordinary phases follow changing views of the Moon’s sunlit half. An eclipse needs the Sun, Earth and Moon to line up closely.
How are moon phases different from eclipses?
The Moon reflects sunlight. At any time the Sun illuminates roughly half its sphere, while an observer on Earth sees a changing portion of that illuminated half. This creates the familiar phases. A lunar eclipse, on the other hand, happens when the Moon enters Earth’s shadow. A solar eclipse happens when the Moon passes between the Sun and Earth, casting a shadow on parts of Earth. The Moon’s orbit is tilted relative to Earth’s orbital plane, so most new moons and full moons do not produce eclipses. Keep these explanations separate in a school chart; they involve different geometry.
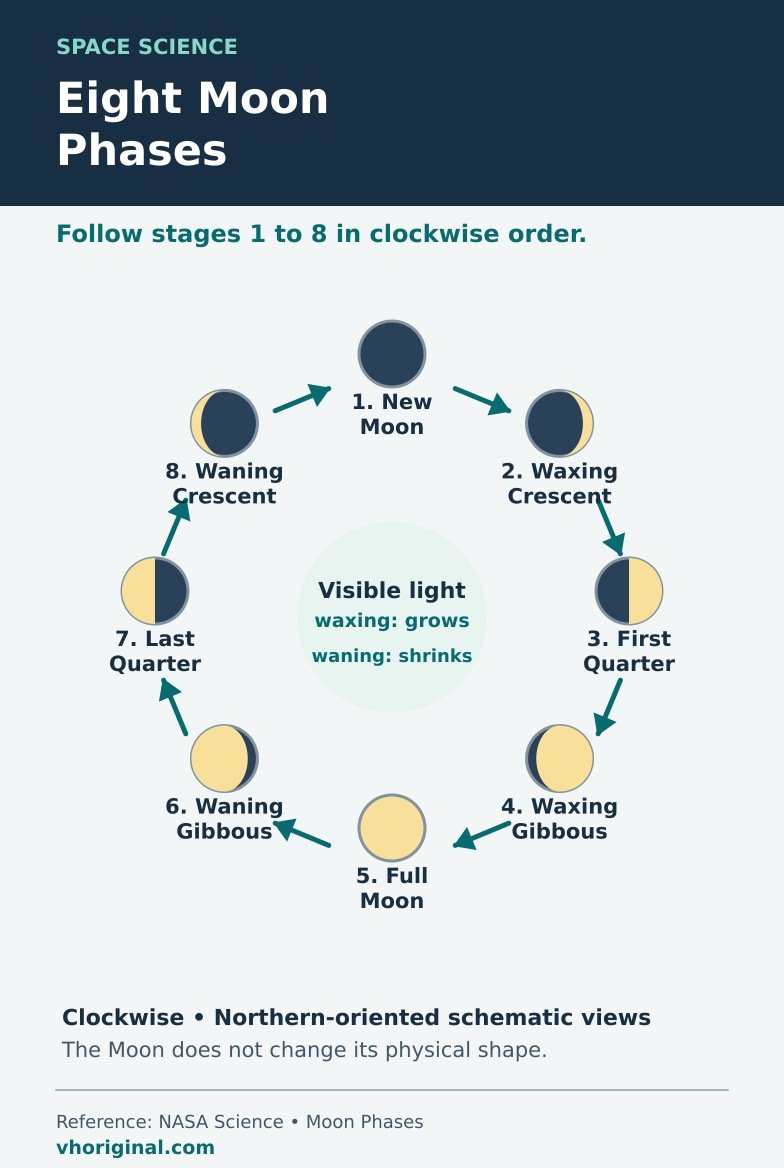
Picture 1: Moon Phases Rotating Wheel
A phase wheel can label New Moon, Waxing Crescent, First Quarter, Waxing Gibbous, Full Moon, Waning Gibbous, Last Quarter and Waning Crescent. Younger students can identify the main four, while older pupils learn all eight names. A rotating paper overlay may have a window revealing each phase as the disc turns. Explain that this is a visual teaching tool, not a scale model of the real orbital distances. The amount of sunlight visible from our viewing angle changes, while the Moon does not manufacture its own light. Ensure the labels follow the correct sequence around the circle.
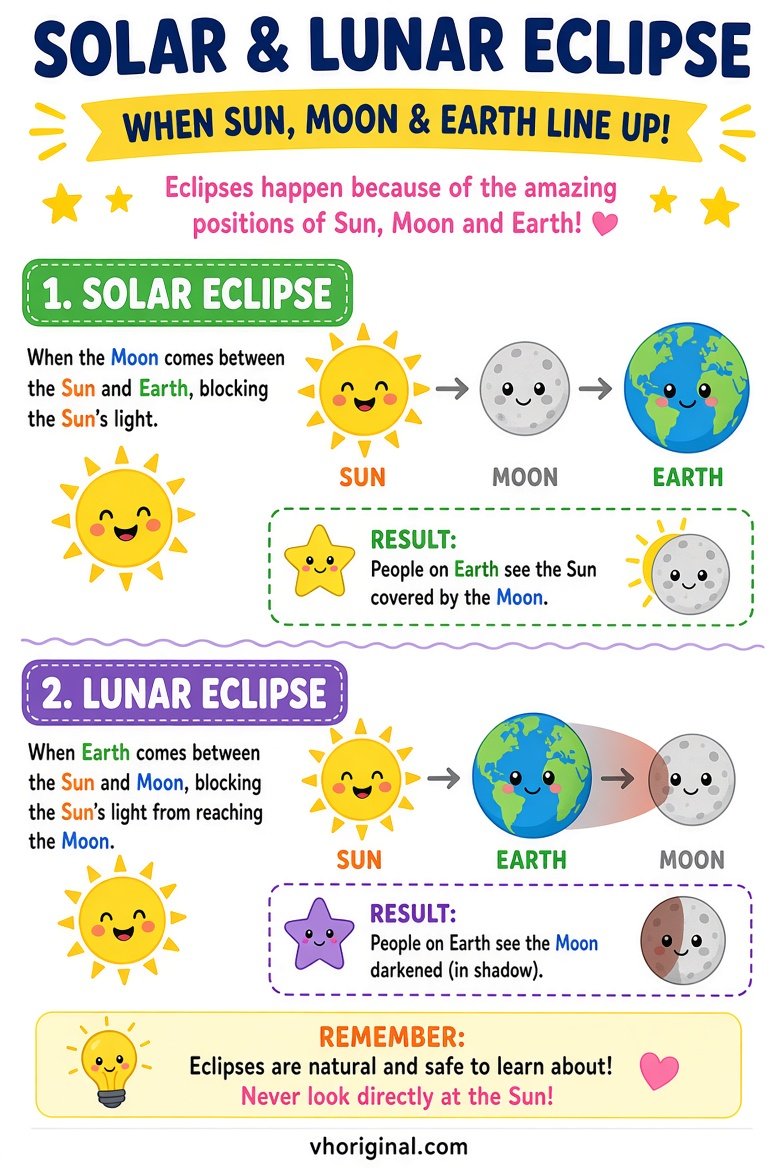
Picture 2: Solar and Lunar Eclipse Comparison
For a solar eclipse the main order is Sun–Moon–Earth; a suitably aligned Moon can cast its shadow on a portion of Earth. For a lunar eclipse the main order is Sun–Earth–Moon, so Earth’s shadow falls on the Moon. Solar eclipses can occur at new moon and lunar eclipses at full moon, but the orbit’s tilt prevents them from occurring every lunar month. Draw two separate rows with sunlight arrows and shadow regions, and label which body is in the middle. Sizes and distances in a small diagram are illustrative, not astronomical scale.
Understanding the eight phases in sequence
One lunar phase cycle takes about 29.5 days on average. Waxing means the visible illuminated portion is increasing; waning means it is decreasing. The First and Last Quarters do not mean we see only one quarter of the entire Moon’s visible disk illuminated—each normally looks approximately half-lit from Earth. The apparent orientation of the bright part differs between locations and hemispheres. Avoid rules such as ‘the bright crescent is always on the right’ without geographic context. Students can arrange eight labelled paper circles and explain the sequence using a single light source as a conceptual model.
Materials for a cardboard moon wheel
Gather stiff paper or cardboard, pencils, colour markers, a compass for drawing circles or a round template, a safe paper fastener and an eraser. Adults should supervise sharp cutting tools. Divide the wheel into eight labelled positions and draw the illuminated areas with clear contrast. Add a second disc with a viewing window if the assignment calls for movement. For eclipses, use three paper circles of different sizes and shadow arrows. State clearly that the toy’s relative distances are not realistic. A legible diagram matters more than elaborate decoration.
Step-by-step: make the phase wheel and eclipse chart
First write the names of all eight common phases from a reliable astronomy reference. Draw a circle, divide it into equal sections and sketch each phase in the correct order. Attach a rotating cover if desired. Next make two clear eclipse rows. Place Moon between Sun and Earth in the solar row, and Earth between Sun and Moon in the lunar row. Draw shadows only where the geometry allows them, then verify the labels. Give a one-sentence explanation beside each diagram. Finish by asking the student to tell why ordinary phases occur even when no eclipse happens.
Safe observation and solar-eclipse warnings
Moon phases can be observed safely on ordinary evenings, subject to visibility and local weather. Students can record the date, apparent shape and time of an observation. Solar eclipses require special precautions. Ordinary sunglasses are not suitable protection for viewing the bright Sun, and unfiltered optical devices may cause serious eye injury. Follow appropriate authoritative solar-viewing instructions rather than improvising with dark plastic or homemade filters. There is no educational need to point a telescope at the Sun during an A4 school project. Cardboard models can explain alignment safely indoors.
Presentation questions and mistakes to avoid
Teachers may ask why eclipses are uncommon or how solar and lunar eclipses differ. The answer involves orbital geometry and a change in which object casts a shadow. Check that the arrows in the poster actually represent sunlight or shadow. A reversed Sun–Earth–Moon order can completely change the explanation. Open the full-size links beneath each picture to save or examine them before drawing. If school requires handmade work, keep the picture as a reference rather than substituting a ready-made print.
Making the classroom demonstration engaging
Turn the wheel to identify one phase, then compare which object lies in the middle during solar and lunar eclipses. Ask pupils to explain why phases happen without an eclipse. Mention that the model is not to scale.
Frequently asked questions
Are ordinary moon phases caused by Earth’s shadow?
No. They result from viewing different portions of the Moon’s sunlit half.
When is a solar eclipse possible?
Around new moon, if the Sun, Moon and Earth align appropriately.
When is a lunar eclipse possible?
Around full moon, when Earth can cast its shadow on the Moon.
Why does an eclipse not happen every month?
Because the Moon’s orbital plane is inclined, preventing most direct alignments.
Conclusion and sources
A phase wheel and eclipse comparison work best when they teach the changing view of the Moon and the rarer geometry of shadows as two different concepts.
Related projects: Solar System Drawing · Chandrayaan-3 Model
References: NASA — Moon Phases; NASA — Why Eclipses Happen; NASA — Eclipse Safety.
Related project: eight planets cardboard model
Sources: NASA • Moon Phases




Share Your Opinion
Comments are closed on this post.